Monday, February 25, 2013

Retouching


You know how everyone always says, "You're perfect the way you are"? Then Photoshop came along. We suddenly had a way to fix or even eliminate all the parts of us that didn't fit in with societal ideals of beauty. And pretty much all that 'perfect' stuff went out the window. That being said, retouching has been my favorite unit so far. The fact that a beginning photoshopper such as myself can do all these changes makes me realize just how much is changed from start to finish on a professional job. 


For this picture...

- erased any and all blemishes using patch tool and spot healing
- went over the whole face with gaussian blur
- highlighted cheekbone
- lightened and contoured face
- accented jaw
- smoothed undereye wrinkles
- eliminated undereye shadow
- filled in eyebrows
- smoothed lips
- changed eye color
- made bottom lip bigger
- decreased skin redness
- accented cheekbone
- enlarged eyes
- highlighted browbones


As they say, perfection is never real.


Wednesday, February 20, 2013

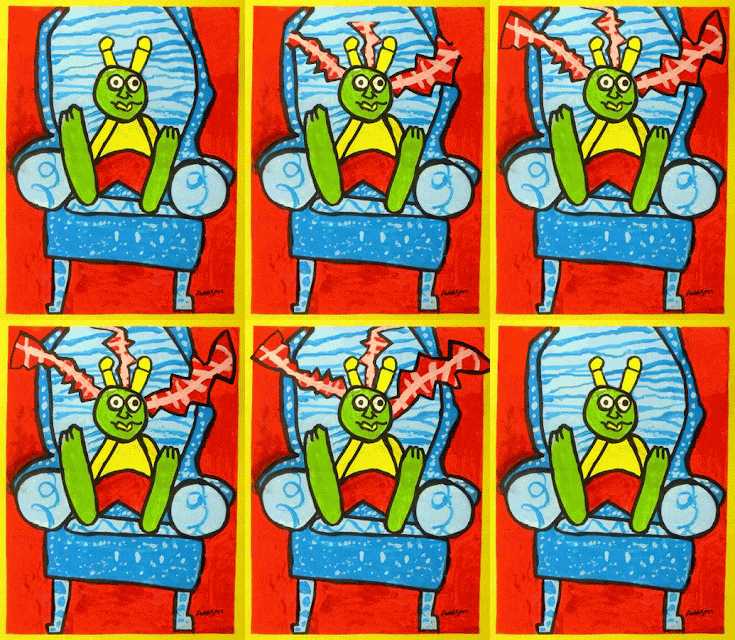
He Came With the Couch


 This animation was taken from a children's drawing posted on Artsonia. The kids read a book called He Came With the Couch and drew creatures to go along with the story. The artist that made this said "My creature wus on a cloud it mad strorms.It wus raning."


You can see their entire gallery at http://www.artsonia.com/museum/gallery.asp?exhibit=574796


I decided to make it look like there was lightning shooting out of his head. The most difficult part of completing this piece was making all the different layers for each frame of the .gif and recreating the background when the lightning was erased. I learned how to use the paintbrush tool efficiently, using the Alt key to easily sample colors from the eye dropper tool.

Tuesday, February 12, 2013

What do you get when you cross a Kangaroo, a Crocodile, and a Velociraptor?

Sounds like the beginning of a bad joke, doesn't it?

I'd like to introduce everyone to Macropus Velociraptorae, commonly known as Velociroo. He's what happens when the head, claws, and feet of a velociraptor get combined with a kangaroo's body and crocodile spikes.


The hardest part of this project was the beginning. It seems that when searching for images to use for a project, you can pick between high resolution, uncropped, or good quality pictures. Found one? It's copyrighted. I have a newfound respect for photoshoppers everywhere.

For this CA2 assignment, I copied the head of the dinosaur (after rough erasing the surrounding area) and pasted it onto the kangaroo. To make it blend in, I used a low opacity eraser and clone stamp on the neck. I used a burn tool to add faint stripes to the kangaroo's body, then individually added a dinosaur claw to each of its fingers. Turns out kangaroos already have large claws, but I wanted them to be the same color as the feet. I pasted the velociraptor feet over the kangaroo's, then used the clone stamp to add fur to the top. The crocodile spikes were added about three at a time to the kangaroo with a reduced opacity near the ends. Needless to say, this project was basically all erase, copy, paste, transform. In the end I had about 25 raster layers.

I'll probably change the baby kangaroo into a velociraptor and add a background later.

Wednesday, February 6, 2013

Colorizing


We took a photo of a dancer and changed the threshold, then made a new layer and painted over it. By changing the underlying layer's blending options, we confined the colors to where the picture was black. I'm not a huge fan of my color placements, but this was just an exercise so I'll leave it for now.

Tuesday, February 5, 2013

Photobooth


For this picture, I used a screencap of Toothless from How to Train Your Dragon, a picture of a curtain, and a self portrait. My arms are overlapping with the dragon, and we are 'interacting' as if we were in a photobooth. I had to erase a bunch of each picture to make them cohesive, using a clone stamp to add extra dragon at the bottom to make it fit the crop. I also used drop shadows on both the dragon and the portrait layer. I tried to make the areas where the two layers touch more believable, but it's still a little weird.